
Introduction
If you’re looking for a way to enjoy homemade bread without the hassle of kneading, this easy no-knead whole wheat bread recipe is your answer. Perfect for young professionals and homemade-food lovers alike, it combines simplicity with flavor, allowing you to bake a delicious loaf while managing your busy lifestyle. Imagine coming home after a long day, the aroma of freshly baked bread filling your kitchen, and all you had to do was mix a few ingredients and wait.

This bread not only satisfies your craving for wholesome, comforting food but also provides a healthy alternative to store-bought options. Made with just four key ingredients—whole wheat flour, salt, instant yeast, and warm water—this recipe emphasizes the beauty of minimalism in cooking. The fermentation process allows for an incredible rise and flavor development without requiring the effort of traditional kneading. It’s the perfect solution for those who want to enjoy the benefits of homemade bread without dedicating hours to the process.
As you follow this recipe, you’ll learn to appreciate the art of patience, as the dough slowly transforms over time. With a little planning, you can enjoy a warm, crusty loaf that is not only delicious but also packed with nutrients. Let’s dive into the details of how to make this delightful no-knead whole wheat bread and elevate your homemade sandwich game!
Key Ingredients
Whole Wheat Flour (3 cups)
Whole wheat flour is the star of this no-knead bread, providing a rich, nutty flavor and a hearty texture. It’s packed with fiber and essential nutrients, making your bread not only tasty but also a wholesome choice for your diet.
Salt (1 ½ teaspoons)
Salt enhances the flavor of the bread and helps regulate yeast activity, ensuring a balanced rise. It’s a crucial ingredient that brings out the natural sweetness of the whole wheat flour, giving your bread a delightful taste.
Instant Yeast (½ teaspoon)
Instant yeast is the driving force behind the dough’s rise, allowing for a light and airy loaf. Unlike active dry yeast, it can be mixed directly with dry ingredients, making the preparation process simpler and quicker.
Warm Water (1 ½ cups)
Warm water activates the yeast, providing the necessary environment for fermentation. It helps to combine the ingredients effectively, ensuring that the dough is moist and ready for the long rise that characterizes this no-knead recipe.
This combination of ingredients is what makes the no-knead whole wheat bread both easy to make and deliciously satisfying. By using simple, wholesome ingredients, you can create a bread that is perfect for sandwiches or simply enjoyed with a pat of butter.

Why You’ll Love This Recipe
When it comes to homemade bread, this no-knead whole wheat bread stands out for several reasons. First, it’s incredibly simple to make, requiring minimal effort and just a few staple ingredients. Perfect for busy young professionals and homemade-food lovers, this recipe allows you to enjoy the satisfying process of bread baking without the time commitment typically associated with it.
Another reason to love this recipe is the depth of flavor and nutritional benefits it offers. Whole wheat flour provides a rich, nutty taste while also being packed with fiber and essential nutrients, making every slice a wholesome choice. Whether you enjoy it as a sandwich base or simply with a spread of butter, each bite delivers a satisfying crunch and a soft, flavorful interior.
Plus, the long fermentation time allows for a unique flavor development that’s hard to achieve with traditional quick breads. As the dough rises, it develops a delightful tang, elevating your bread from ordinary to extraordinary. You’ll find that this no-knead whole wheat bread not only meets your culinary needs but also enhances your appreciation for homemade foods.
Variations
Exploring variations of your no-knead whole wheat bread can open up a world of flavor and creativity in your kitchen. One popular twist is adding seeds or nuts to the dough. Chia seeds, sunflower seeds, or walnuts not only enhance the texture but also increase the nutritional value, making your bread even more wholesome.
Another delightful variation is incorporating herbs or spices. A tablespoon of rosemary or a sprinkle of garlic powder can add an aromatic touch that pairs wonderfully with savory dishes. If you’re feeling adventurous, consider adding a handful of grated cheese to the dough before baking for a cheesy, delicious loaf.
For those who enjoy a hint of sweetness, mixing in dried fruits like raisins or cranberries can transform your bread into a delightful breakfast option or a sweet treat. Pairing this fruity variation with a bit of cinnamon can elevate your no-knead whole wheat bread to new heights.
No matter which variation you choose, this bread remains an easy, approachable recipe that adapts beautifully to your tastes. So, roll up your sleeves and get creative—the possibilities are endless!

Cooking Tips and Notes
When making no-knead whole wheat bread, there are several tips to ensure your loaf turns out perfectly every time. First, the long resting period is crucial; allowing the dough to sit for 12 to 18 hours lets the flavors develop and the gluten to relax, resulting in a softer texture.
Remember to check the water temperature! It should be warm but not hot—around 100°F (38°C) is ideal. This temperature activates the yeast without killing it, promoting a good rise. If you live in a humid environment, you might need to adjust the flour slightly; a little extra flour can help if the dough seems too sticky.
For a crustier loaf, consider baking without the lid for the last 15 minutes. This will give the bread a beautiful golden-brown crust that is both crunchy and satisfying. Lastly, always let your bread cool on a wire rack before slicing. This cooling period allows the steam to escape, ensuring that your bread maintains the right texture and doesn’t become gummy. Enjoy your freshly baked no-knead whole wheat bread as a delightful addition to any meal!
Serving Suggestions
No-knead whole wheat bread is incredibly versatile, making it perfect for a variety of meals. Enjoy it fresh out of the oven, slathered with butter or your favorite spread for a simple yet satisfying snack. For a heartier option, use this bread as a base for sandwiches; it pairs wonderfully with turkey, avocado, and fresh greens.
You can also toast slices for breakfast and top them with avocado and poached eggs for a nutritious start to your day. For a delightful twist, slice the bread thinly and use it to make bruschetta, topped with diced tomatoes, basil, and a drizzle of balsamic glaze. No matter how you serve it, this easy no-knead whole wheat bread will elevate any meal!

Time Breakdown
To create your delicious no-knead whole wheat bread, here’s a quick overview of the time involved in the process:
Preparation
12 to 18 hours for dough fermentation, allowing flavors to develop.
Cooking/Baking
45 minutes in total, including 30 minutes covered and 15 minutes uncovered for a perfect crust.
Total
Approximately 12 hours and 45 minutes from start to finish.
Efficiency Tip: Prepare the dough in the evening, so it can ferment overnight, making it ready to bake the next day with minimal effort.
Nutritional Facts
Understanding the nutritional profile of your no-knead whole wheat bread can help you make informed choices about your diet. Each slice contains approximately 100 calories, making it a low-calorie option for sandwiches or toast. With 1g of total fat and 4g of protein, this bread offers a nutritious way to fuel your day.
Additionally, it packs in 22g of carbohydrates, including 3g of dietary fiber, which aids in digestion and keeps you feeling fuller longer. This makes it a great choice for those looking to maintain a balanced diet. With 200mg of sodium and no cholesterol, this bread aligns well with heart-healthy eating. Overall, this easy no-knead whole wheat bread is not only delicious but also a wholesome addition to your meals!
FAQ based on “People Also Ask” Section
Can I use all-purpose flour instead of whole wheat flour?
Yes, you can substitute all-purpose flour for whole wheat flour, but keep in mind that the texture and flavor will differ. Whole wheat flour adds a nuttier taste and denser texture, while all-purpose will yield a lighter loaf.
How long does no-knead bread last?
No-knead whole wheat bread typically lasts 3 to 5 days at room temperature when stored in a paper bag. For longer storage, consider freezing it, where it can last for up to three months without losing its quality.
Can I add ingredients like seeds or nuts to the bread?
Absolutely! Adding seeds, nuts, or herbs can enhance the flavor and nutritional profile of your no-knead whole wheat bread. Just be sure to adjust the flour quantity slightly if adding a significant amount.
What should I do if my dough doesn’t rise?
If your dough doesn’t rise, it could be due to inactive yeast or insufficient warmth. Ensure your yeast is fresh and try placing the dough in a warmer area to encourage fermentation.
Conclusion
In conclusion, this easy no-knead whole wheat bread is a fantastic addition to your baking repertoire. With its simple ingredients and hands-off approach, it caters perfectly to time-pressed young professionals and homemade-food lovers alike. The long fermentation process not only enhances the flavor but also allows for a healthy, nutritious loaf that is versatile enough for sandwiches or enjoyed with butter.
By following the straightforward instructions, you can achieve bakery-quality bread right in your own kitchen. Don’t hesitate to experiment with variations, like adding seeds or herbs, to make this recipe your own. So why not roll up your sleeves and give it a try? Enjoy the satisfaction of baking your own bread and share the results with family and friends—your homemade no-knead whole wheat bread is sure to impress!
Print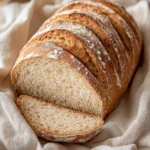
No-Knead Whole Wheat Bread
- Total Time: 12 hours 45 minutes
- Yield: 1 loaf 1x
- Diet: Vegetarian
Description
This easy no-knead whole wheat bread is perfect for homemade sandwiches or just with butter on the side!
Ingredients
- 3 cups whole wheat flour
- 1 ½ teaspoons salt
- ½ teaspoon instant yeast
- 1 ½ cups warm water
Instructions
- In a large bowl, mix together the flour, salt, and yeast.
- Add warm water and stir until combined.
- Cover with plastic wrap and let sit at room temperature for 12 to 18 hours.
- Once the dough has risen and is bubbly, turn it out onto a floured surface and shape it into a ball.
- Let the dough rest for another 1-2 hours.
- Preheat your oven to 450°F (230°C) and place a Dutch oven inside to heat up.
- Carefully place the dough into the hot Dutch oven, cover, and bake for 30 minutes.
- Remove the lid and bake for an additional 15 minutes until golden brown.
- Let cool on a wire rack before slicing.
Notes
- For a crustier loaf, bake without the lid for the last 15 minutes.
- Store leftovers in a paper bag or freeze for later use.
- Prep Time: 12 hours
- Cook Time: 45 minutes
- Category: Breads
- Method: Baking
- Cuisine: American
Nutrition
- Serving Size: 1 slice
- Calories: 100
- Sugar: 0g
- Sodium: 200mg
- Fat: 1g
- Saturated Fat: 0g
- Unsaturated Fat: 0g
- Trans Fat: 0g
- Carbohydrates: 22g
- Fiber: 3g
- Protein: 4g
- Cholesterol: 0mg